LeetCode in Mendix: Enter The Dungeon
If you’re just tuning in to this series for the first time, here’s a recap of what has happened so far: I thought it would be a fun challenge to take LeetCode problems that developers use to prepare themselves for potential interviews – and solve them using low-code. In our first challenge – The Sum of Its Parts – we took an easy problem as a starting point and used Mendix to solve it. Next, we upped the ante and went for a medium-difficulty challenge, which you can read all about in our post The Two Towers.
The search for the perfect quest
Now it’s time to try a hard challenge and this is where things start to get a little tricky.
I spent a long time looking for the right challenge to attempt because most problems I came across were just rehashes of the earlier array-based problems albeit with slight variations to squeeze out more efficiency in fewer lines of code. I think it’s safe to say that we can’t really do that with Mendix and that’s certainly not the point of these articles.
The next set of problems I came across involved multi-dimensional arrays. A relatively simple concept in basic programming languages and a quick way to store grids of data. In a table-based system like Mendix, it’s not as elegant. However, one problem jumped out at me as something that could be done in a practical way and was also an interesting concept. Challenge one-hundred-and-seventy-four: “Dungeon Game”.
Enter the dungeon
The main elements of our quest:
- The brave, intrepid knight. 🛡
- The prisoner, waiting to be rescued. ⛓
- The dungeon 🚨
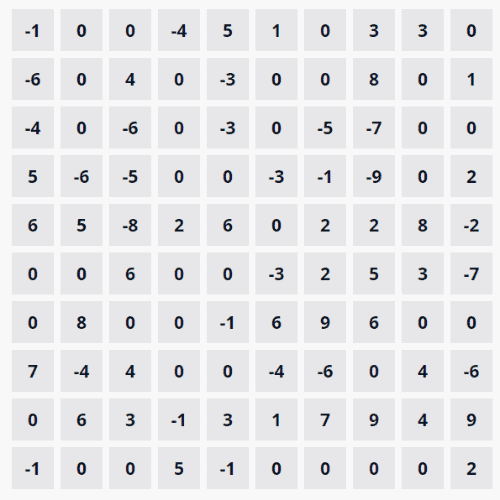
In this challenge, we are going to create a dungeon through which our brave knight must venture to save the prisoner in the last room. The dungeon, conveniently, is a square grid of rooms and in each room can be found one of the following:
- Nothing at all – a zero and does nothing.
- A demon 👿 – a negative number and reduces our knight’s health score.
- A magic orb 🔮 – a positive number and increases our knight’s health score.
Our plucky knight must move through the dungeon from the top left to the bottom right by only taking moves to the right or down because he has a morbid fear of going left and up. I may have made that last bit up, it’s just an arbitrary rule so we don’t get stuck in a loop.
Our job as the dungeon master is to work out what the minimum health our knight must start with to reach and survive the last room; finishing with one health point.
In which we create a dungeon
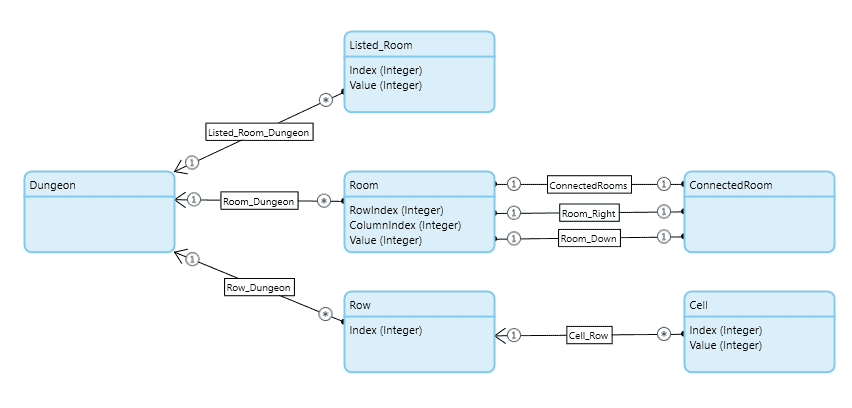
First thing’s first, we need a way to store the data to represent the dungeon. A few options present themselves:
One, there’s the easy way out where we can just have a straight list of rooms. To navigate we would simply move from one room to the next by moving one row for a right move and n rooms for a downward move where n is the number of cells in our square. That feels a bit like cheating though, given that the challenge involves taking in a multi-dimensional array.
Next up there’s a more Mendix way of doing it where we can still keep each room in a list, with the row and column indexes for reference, and store a link from each room to the one to its right and the one below. This makes it easy to traverse from one room to the next via associations. It’s still not really a fair representation of a multi-dimensional array, though.
Finally, and the way we’ll start this exercise is by first creating a “Row” entity to represent a row of cells with an index attribute to keep them in order. Next, we’ll create a child entity for that called “Cell” to represent each room in that row, once again with an index to keep them in order. This will act much more like a multi-dimensional array in practice. It’s not going to be as efficient to navigate as the true Mendix approach, but we’re trying to keep as close to the brief as possible.
We have our data store, so let’s populate it with numbers. We’re not worried about efficiency for this part so a couple of nested loops will do the job. I also added attributes to the Dungeon entity for grid size and max cell value so it can be configured for different ranges. For now, they’re both defaulted to 10. The main body of the data load looks like this, simple.
If we output that to the screen and add a bit of SASS styling to the gallery widgets, you end up with something that looks a lot like the dungeon from the example:
In which we plan our route
Now we need to traverse the dungeon keeping in mind that our knight can only move right and down. We’ll start in the top left corner, at grid reference zero-zero, and we’ll check which is the next optimum step from there. In the above example, it would be a right step. We want to take the step that gives us the highest respective value, which in this case is zero. We also must remember that we’ll need to keep track of the knight’s health and how low it goes, so it’s probably worth adding another attribute to our dungeon for current health and lowest health.
Our bold knight starts his journey in the first cell. It’s not a great start as he’s already lost a point of health, so we’ll start our flow by putting him in the first cell and calculating his starting health.
When we run this, it’ll update the first cell to show where he is and update his health score.
Let’s follow this up by finding a path through the dungeon which takes the next best step. One way to do this is to use a recursive Microflow call that compares the options to the right and below and picks the one with the best impact on health.
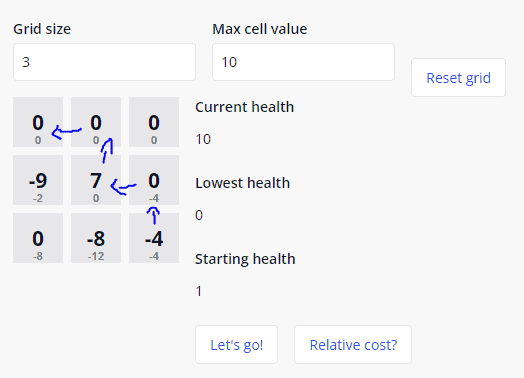
Using this function, we can map that path out. It’s not necessarily the best path, but it’s at least a viable one. We can also see what the lowest dip in health is, so starting with one point more than that will give us a suitable health value to begin with. For the example below, we’d need to start our knight off with 10 health.
We now have one path through the dungeon and a health score that will get our knight to the prisoner. How do we know it’s the best path – the one that will require the lowest health points? The answer is we don’t. To understand that, we’d need to try a bottom-up approach that works out the optimum step at each point and tracks the amount of health deficit the knight will suffer on his journey.
In which we find a better route
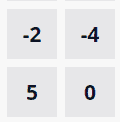
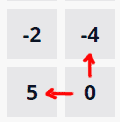
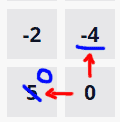
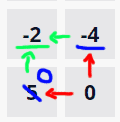
To do this we’ll start at the end, with the prisoner, and work our way out and back up the grid. Every step we’ll need to work out the relative cost of moving from the square we’re in on to the next. Let’s take an example from the grid:
- We work out the relative cost of moving from 0 in the bottom right to 5 or -4 .
- Moving to -4 is going to cost us 4 health.
- Moving to 5 doesn’t cost us any health, in fact, we gain health so the relative cost is 0.
- Finally, we work out the cost of the best step from the -2 square, which is from -2 to 0, so the final cost of that square is -2.
From a Mendix point of view, this means we’re going to need a Microflow to loop through the grid, backward, row by row, and cell by cell. In step one, we add an attribute to each cell where we can store the relative cost of the cell and get it showing on the screen.
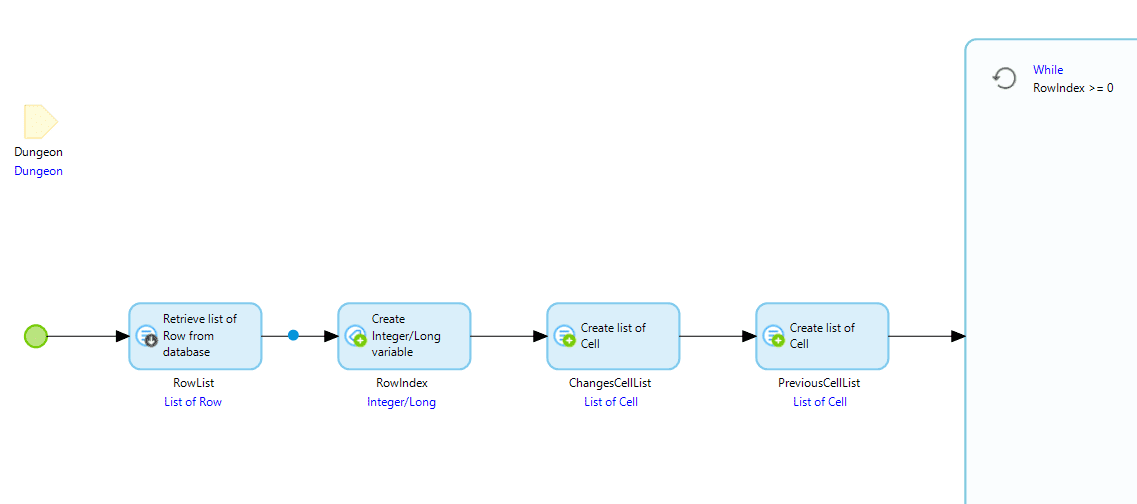
Next, we’ll get the rows list we need and set up a loop to iterate through each row in a reverse order, which means we’ll need an index to track the row and a while loop to keep it going until we get to the first row (or the last row, depending on how you look at it!).
As you can see, we can also create a couple of empty lists. One for collecting up any changes to cells as we update the relative cost so we can do a bulk update at the end, and one for storing the cells from the previous iteration so we don’t need to do two retrieves.
Inside this new loop is where the real magic happens. We’re going to get the cell list for the current row iteration and loop through all the cells in it. For each of those cells, we’ll check where it’s positioned in the grid because if it’s on either the bottom or the right-hand side we need to handle it differently to cells that have two possible exit points.
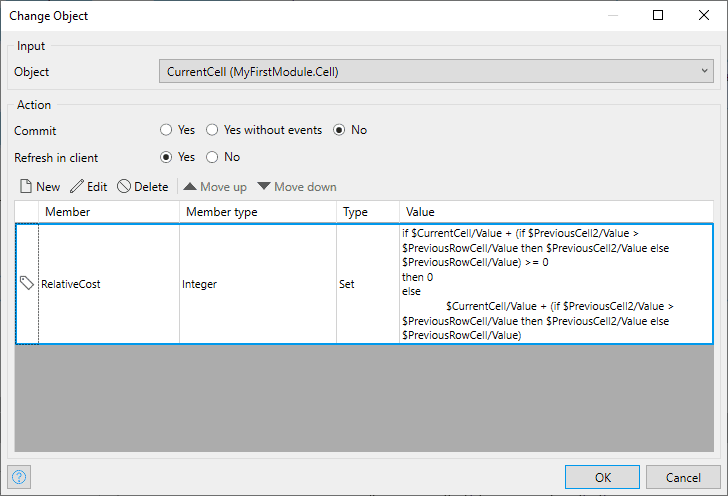
For each cell, we need to update the relative cost based on the best exit point. In the case of the bottom row and the last column, it’s just the cell to the right or below added to the value of the current cell. In all other cells, it’s the value of the current cell plus the value of the greatest exit point. Keep in mind that if the final value is greater than zero, then we just reset the value to zero, as its relative cost is nothing. In the most complicated instance, we end up with a calculation like this:
Those loops will take us through the entire grid moving our relative cost up and to the left until we reach the first cell and exit both loops. At this point, we’ll work out the minimum starting health needed, which is the relative cost of the first cell plus one, and store it against the dungeon.
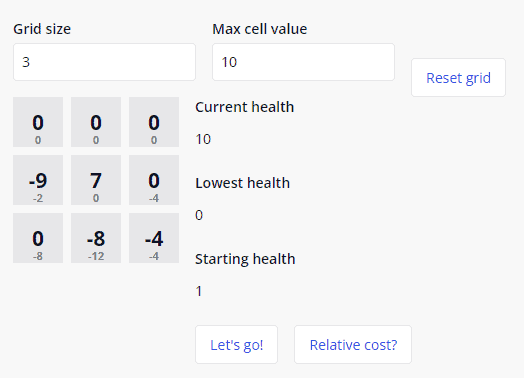
At this point, I also added the ability to configure the size of the dungeon and regenerate it so I could test it on a smaller dungeon. It now looks like this and you can see that it appears to be working out the right answer!
In which we celebrate our success
So that’s it! Technically, we’ve completed this hard task – cue the celebrations! I’ve not tracked performance and I doubt it’s as performant as some of the standard code solutions, but it’s pretty responsive as far as I can tell and it looks like an elegant solution. If we were to continue I’d probably want to go back to tracking the optimum path and marking the path our noble knight should move through this dastardly dungeon to rescue our prisoner in peril! If anyone wants to see that let me know.
Thanks for reading along as we test out different challenges in low-code. Got a problem you’d like to see tackled next? Feel free to reach out and drop a suggestion!

