Or download the ‘Blank GenAI‘ starter app template when creating your app, as it comes preloaded with all the required modules.
Setting up the modules
Setting up the modules is easy and straight forward. Simply download the ‘Open AI‘ and ‘GenAI for Mendix’ modules from the Marketplace. Additionally, these modules have dependencies on the encryption and community commons modules. Always remember to set the encryption key after downloading the encryption module as this is required before the app will function.
After downloading the needed modules, you will need to make some small configurations so that your app administrator is able to login and configure the OpenAI connection. Assign the Open AI Module role for Administrator to the ‘App Administrator’ user role.
Add some navigation to the page OpenAIConnector.Configuration_Overview or include the snippet OpenAIConnector.Snippet_Configurations to a page which is accessible by your administrator.
Runtime configurations
Next run the app and login as the MxAdmin in order to set up the connection details. After logging in, navigate to the configuration overview page added a moment ago and add a new config.
To add a new connection, you need to complete the pop-up window by entering the following:
- A display name for the connection (can be anything)
- API type (choose OpenAI)
- Endpoint https://api.openai.com/v1
- The token/API key from OpenAI developer platform
If you need more information to get this set up, there’s a detailed explanation on the documentation page that covers how to configure the connection. There are also steps on how to obtain your API key.
Deployed models
Upon saving the connection details you will see another pop–up, this one displaying the deployed models (the OpenAI models your app will have access to). By default, after adding an OpenAI connection, your deployed models will be pre–populated with all default options. You shouldn’t need to change any of the deployed models unless you have a need for a different model. You can always return later and edit these as needed by clicking on the three–dot menu and selecting Manage Deployed Models.
Testing the connection
After adding the configuration and managing your deployed models, you should test out the connection before proceeding. On the Configuration_Overview page, you can find the Test page under the three-dot menu. If the connection works, you will see a green success message. If it does not, a red failure message will show up.
If it fails, make sure to double check your connection details as well as the application logs for more troubleshooting insights.
Building the chat interface for the AI
All that is left at this point is to implement the actual chat functionality with the model. Luckily there is no need to build anything custom thanks to the Conversational UI module which is included when downloading the GenAI for Mendix module.
The module comes preconfigured and packed with different pages, layouts and all the logic needed to create a functional chat using any LLM. By simply downloading and configuring the module (which involves setting your module roles and duplicating a single microflow) you can have a clean chat interface in minutes.
The module comes with a few different options. You can display the chat using a full page or pop-up, or use the provided snippets to create your own page. I opted to simply duplicate one of the excluded microflows in the module which takes care of everything you need. ACT_FullScreenChat_Open retrieves the $DeployedModel created as part of the admin configuration explained above.It then creates the context for the chat and displays the full screen chat page ConversationalUI_FullScreenChat.
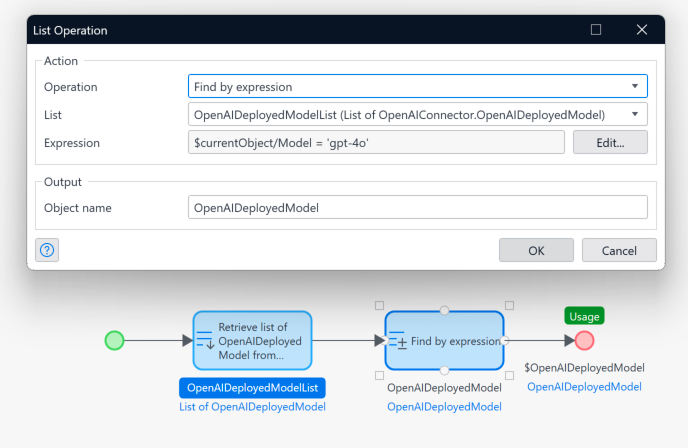
There is 1 minor change I had to make to the microflow (which may occur as explained in the annotation by the developers of the module). After some investigation, this is because the retrieve is looking for Input Modalities, which will be implemented in a future release. Until then it is easy to search for the correct OpenAI deployed Model by its name.
As the annotation states, I simply created a custom retrieve to get all available models and filter for ‘gpt-4o’.

After this minor alteration and passing the new $OpenAIDeployedModel (a generalization of $DeployedModel) it worked seamlessly, and I was able to run my app and chat with the model.
Thanks for reading
Having completed many past implementations of an AI in a Mendix app – this is by far the most refined process to date. There is almost no need for any custom work beyond configuring the modules, it‘s truly a streamlined and effortless process. There is no better time to experiment with AI in Mendix than right now! I hope you enjoyed reading and I’ll see you in the next piece when we tackle the same functionality – except using Azure!
Read more in Docs


